
How to Install ReShade: A Step-by-Step Guide
1. Zenteon Shader compatibility
Zenteon and Zenteon+ shaders for ReShade are compatible with any games using DirectX10 and above, as well as games running newer versions of OpenGL and Vulkan. To see if your game is compatible, check the API section for it on PCGamingWiki.
2. Introduction
ReShade is a powerful post-processing injector for games and applications, allowing users to customize visuals with effects like ambient occlusion, depth of field, color correction, and more. This guide will walk you through downloading, installing, and configuring ReShade for optimal performance and compatibility.
3. Downloading ReShade
To ensure a safe and smooth installation, always download ReShade from the official website: https://reshade.me/
NOTE: Downloading ReShade from unofficial and unverified sources is strongly unrecommended, as they may contain viruses. The official sources for ReShade have never, and will never contain malware.

The standard build is safe to use in almost all single-player titles and any multiplayer titles that don’t explicitly block it. It blocks depth buffer access when network activity is detected to prevent cheating. Note that most competitive multiplayer games will block both builds of ReShade.
The addon support build is meant for single-player games and some co-op titles, it’s fine to use in any games without anti-cheat and allows the usage of ReShade addons, it’s highly recommended for any games that allow it.
4. Installing ReShade
Finding your game Executable
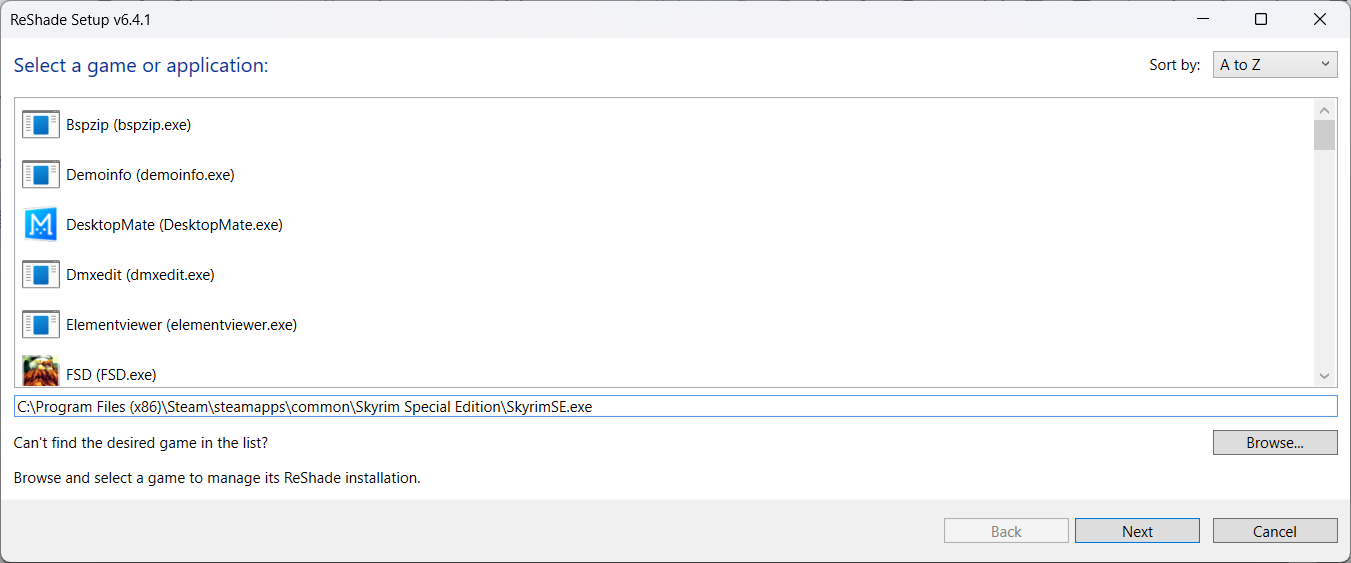
After downloading ReShade, run the installer. It will automatically detect most game executable files, simply select the one for the game you wish to install ReShade to.

If your game executable is not listed, or there are multiple .exe files and you aren’t sure which one to pick, don’t worry. Launch both your game and task manager (ctrl+shift+esc). From there, find your game’s process, right click, and select open file location.

Once you’ve found your game executable, press “ctrl+shift+c” to copy the file path, and paste this into the path bar in the ReShade installer before clicking “next”.

Selecting the Rendering API
Once you’ve found the game exe, you’ll need to install ReShade using the correct rendering API. If you aren’t sure which API your game uses, it can typically be found under the “API” section of your game’s page on PCGamingWiki.

5. Selecting Shaders
When installing ReShade, you’ll be given the option to download a variety of shaders through the installer. If you know you only need a few specific ones you can select them directly. Otherwise, feel free to check as many as you wish (note this will impact compile times on game launch).

6. Selecting Addons
If you don’t need any of the addons for a specific reason (eg, a REST preset), do not install any additional addons. While it won’t be detrimental to have all the addons installed, it can cause instabilities.

7. Configuring ReShade In-Game
Once ReShade is installed, it will provide you with a built-in tutorial explaining the interface.
8. Uninstalling ReShade
To uninstall ReShade, simply run the installer and select your game’s .exe file. After selecting the rendering API, choose “Uninstall ReShade and effects”, and click “next” to uninstall.

9. Additional Troubleshooting
If your ReShade installation is still not working (The menu doesn’t show up after pressing the [Home] key), and you’ve followed the installation instructions correctly, double check the relevant forum pages for your game to see if it has any unique installation instructions (ie. GTA FiveM having a different installation process for ReShade, or Rdr2 requiring ReShade to be installed with Vulkan).
If ReShade is installed correctly, but some effects aren’t working properly, see the Depth Buffer Setup section below.
If you’re still having difficulty, feel free to ask for general troubleshooting on the ReShade discord: https://discord.com/invite/PrwndfH
How to Manually Install Shaders
1. Manual Installation
Shaders that are downloaded outside of the installer have to be installed manually, not to worry though, the process is pretty simple and straightforward.
First, download the archive for whatever shaders you wish to install. Opening the archive you should see both “Shaders” and “Textures” folders, typically with a license.md. Note that this assumes the usage of the standard file structure (ie. the one on Github), some archives may have a slightly different installation process.


In a separate explorer tab, open your game directory, near the top you should see a “reshade-shaders” folder.
Simply drag and drop the “Shaders” and “Textures” folders into the “reshade-shaders’ folder and you’re done. Make sure to launch the game and verify they’ve installed correctly.
Depth Buffer Setup
1. Enabling DisplayDepth
After launching your game with ReShade, the first step to make sure your shaders are working properly is to configure the Depth Buffer. This is a relatively simple process, and only takes a minute or two.
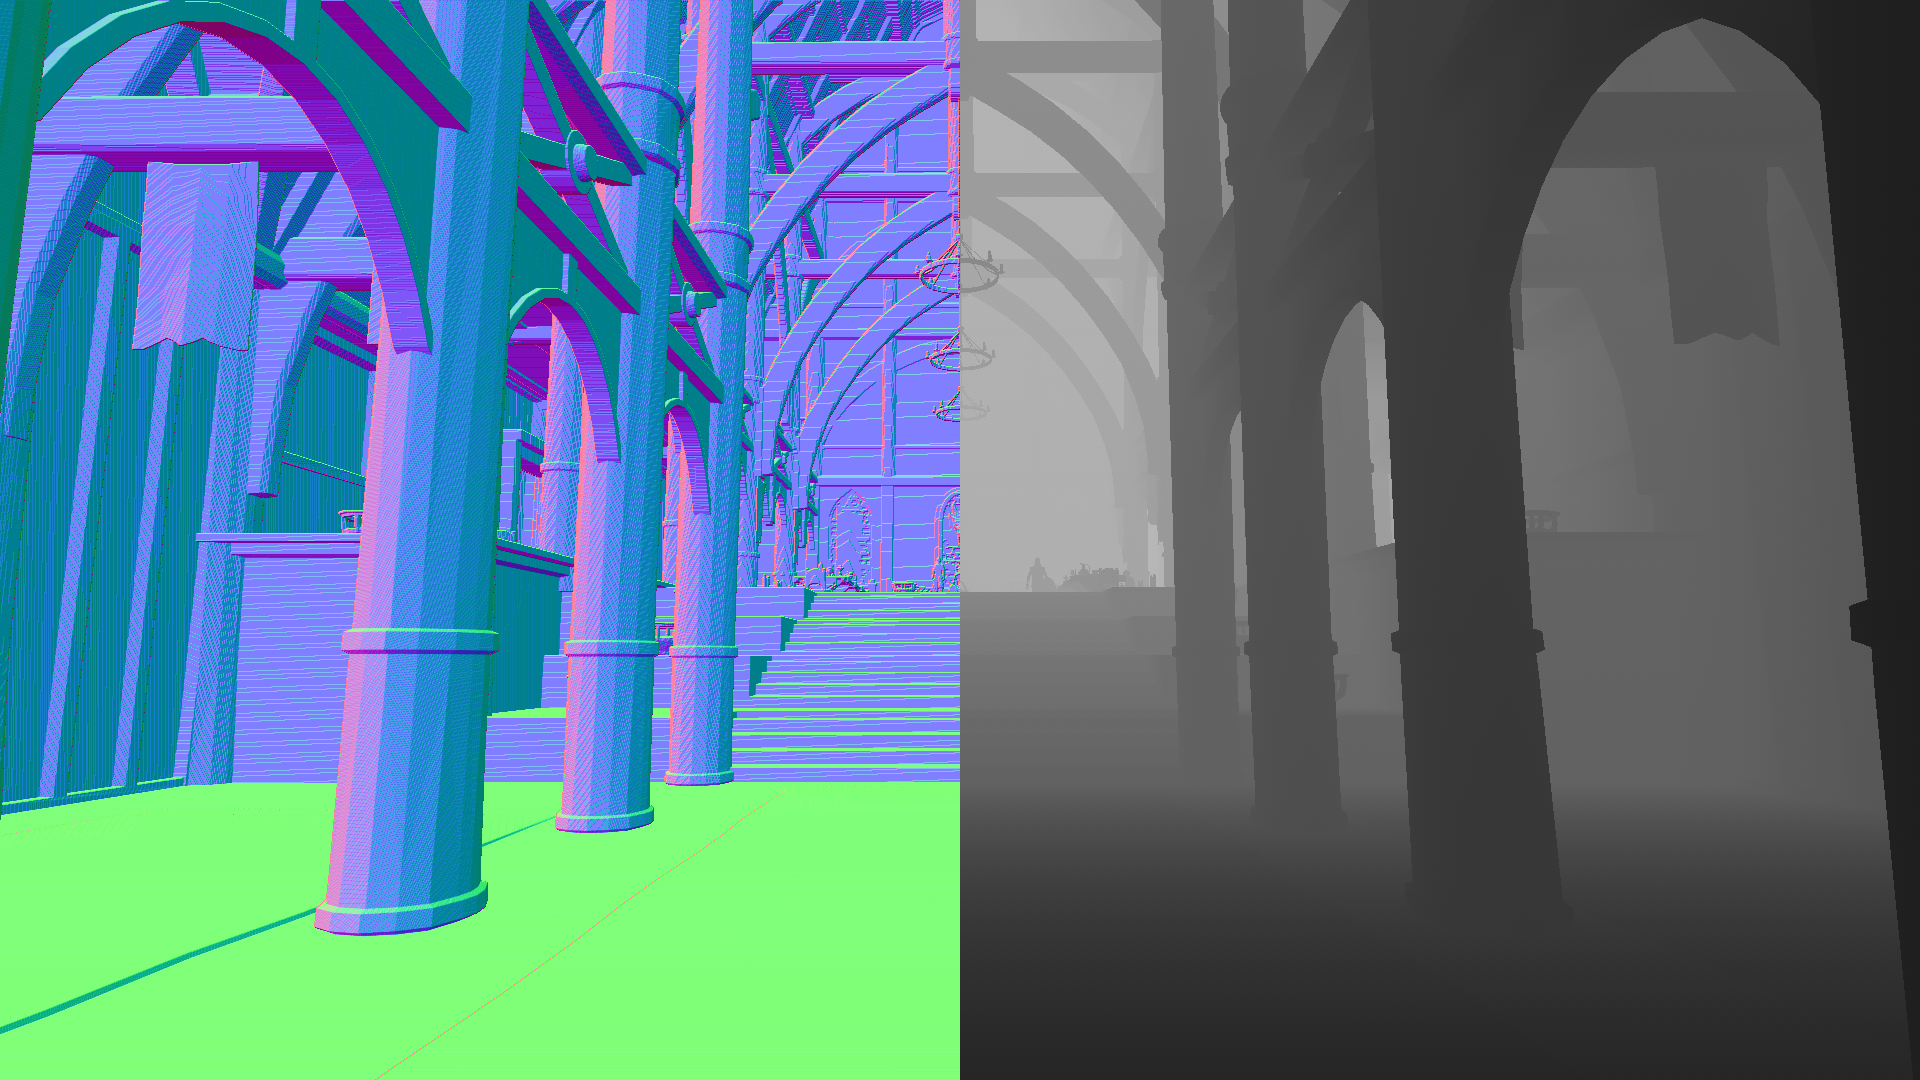
First, enable “DisplayDepth.fx”. It’s automatically downloaded when installing ReShade. You should see a view that looks like this:

On the left are the normals, they should be relatively smooth and low poly, and surfaces facing upwards (ie, the ground) should be green.
2. Common Problems
Incorrect Depth Buffer Selection
If your view looks like this or is completely black, you’ll need to select the correct depth buffer.

This can be done by going to the “Addons” tab in the reshade UI and selecting different checkboxes until you see a result in the DisplayDepth output. The correct depth buffer will usually have the highest number of draw calls, and the same aspect ratio as your game window.

ReShade Global Preprocessors
By clicking on the “Edit global preprocessor definitions” button in the ReShade UI, you’ll be able to see the following global preprocessors. If you are missing any/all of them, you’ll need to add them manually with the “+” icon. They’ve been provided to copy and paste with some default values for your convenience.
RESHADE_DEPTH_LINEARIZATION_FAR_PLANE 1000.0
RESHADE_DEPTH_INPUT_IS_UPSIDE_DOWN 0
RESHADE_DEPTH_INPUT_IS_REVERSED 1
RESHADE_DEPTH_INPUT_IS_LOGARITHMIC 0

Reversed Depth Buffer
If you can see normals in the left side, but the right side is completely black, then you’ll need to change RESHADE_DEPTH_INPUT_IS_REVERSED to the opposite value (0 or 1).

Upside Down Depth Buffer
If the depth buffer is upside down, simply change RESHADE_DEPTH_INPUT_IS_UPSIDE_DOWN to its opposite value (0 or 1).

Logarithmic Depth Buffer
If everything else looks correct, but you see striping in the normals view, change RESHADE_DEPTH_INPUT_IS_LOGARITHMIC to its opposite value (0 or 1).

Other Notes
While some shaders other than DisplayDepth may have debug views for depth and normals, they will likely not work for this guide since DisplayDepth uses a different coordinate space than most shaders.

DisplayDepth Normals/Depth

Zenteon: Framework Normals/Depth